Gitalk
非原创,自己记录下
本文转自:https://asdfv1929.github.io/2018/01/20/gitalk/
Gitalk 是一个基于 Github Issue 和 Preact 开发的评论插件。
注册Register Application
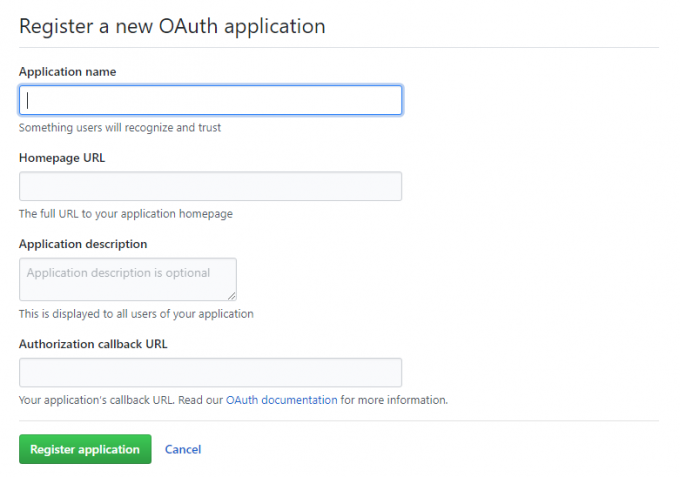
在GitHub上注册新应用,链接:https://github.com/settings/applications/new
参数说明:Application name: # 应用名称,随意Homepage URL: # 网站URL,如https://hermeswu.github.ioApplication description: # 描述,随意Authorization callback URL:# 网站URL,https://hermeswu.github.io
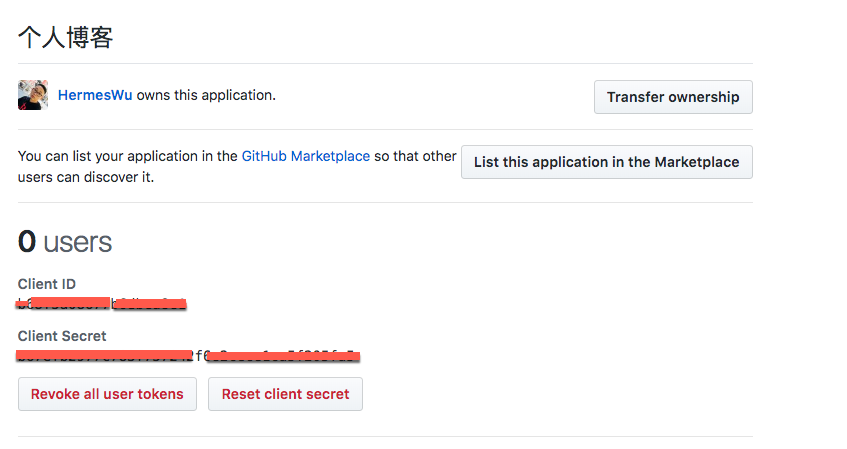
点击注册后,页面跳转如下,其中Client ID和Client Secret在后面的配置中需要用到,到时复制粘贴即可:
配置文件
gitalk.swig
新建/layout/_third-party/comments/gitalk.swig文件,并添加内容:
1 | {% if page.comments && theme.gitalk.enable %} |
comments.swig
修改/layout/_partials/comments.swig,添加内容如下,与前面的elseif同一级别上:
1 | {% elseif theme.gitalk.enable %} |
index.swig
修改layout/_third-party/comments/index.swig,在最后一行添加内容
1 | {% include 'gitalk.swig' %} |
gitalk.styl
新建/source/css/_common/components/third-party/gitalk.styl文件,添加内容:
1 | .gt-header a, .gt-comments a, .gt-popup a |
third-party.styl
修改/source/css/_common/components/third-party/third-party.styl,在最后一行上添加内容,引入样式:
1 | @import "gitalk"; |
_config.yml
在主题配置文件next/_config.yml中添加如下内容:
1 | gitalk: |
以上就是NexT中添加gitalk评论的配置,博客上传到GitHub上后,打开页面进入某一博客内容下,就可看到评论处。
更新:
解决:gitalk 报错 Error: Validation Failed.–MD5 加密 id 避免 github issue lables 50 字符限制
- 创建一个
github gist文件保存 https://github.com/blueimp/JavaScript-MD5/blob/master/js/md5.min.jsjs源码:
https://gist.githubusercontent.com/qhh0205/78e9e0b1f3114db6737f3ed8cdd51d3a/raw/3894c5be5aa2378336b1f5ee0f296fa0b22d06e9/md5.min.js - 将
gist链接嵌入到layout/_third-party/comments/gitalk.swig文件,嵌入时的js链接地址需要注意下:
不能直接写第一步的创建的gitst链接地址,需要将gist.githubusercontent.com替换为rawgit.com。即嵌入地址为: https://rawgit.com/qhh0205/78e9e0b1f3114db6737f3ed8cdd51d3a/raw/3894c5be5aa2378336b1f5ee0f296fa0b22d06e9/md5.min.js
最终layout/_third-party/comments/gitalk.swig配置如下:
1 | {% if page.comments && theme.gitalk.enable %} |
Hypercomments
gitlak感觉不是很好用,也许是我配置的不对,移动端加载有点慢。所以现在改用Hypercomments,感觉很好用诶。
Hypercomments官网注册,需要谷歌账号,推荐蓝灯哦。
添加自己的博客地址,我的添加过了,没有截图了
首页选择
Admin,点击管理,然后在Widget代码框中找到Widget_id,记录下来在NexT主题的配置文件找到
hypercomments_id,填入上面记录的Id。齐活,赶紧瞅瞅去吧。